28 Mar 2013

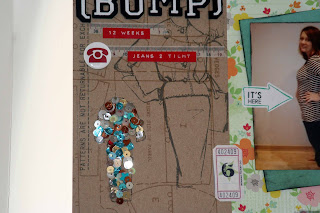
Hello bump...layout!

So I wanted to take pics of my growing bump during my pregnancy, but we haven't proved that good at it. The lack of sunshine has hindered post-work photo shoots and so I have just about got a pic a month. This was a hastily snapped pic at 12 weeks - taken on my phone.


You may have noticed that I am totally in love with my Amy Tan 'hello' stamp and it is featuring on a lot of my recent layouts. It just makes titles fun! In fact I think all of my 'baby' pages so far use it -perhaps it can be a 'thing'. Y'know like Shimelle uses kraft for all of her travel pages - I use 'hello' for all my baby pages.

It's funny that I thought that was bump. Now I am 25 weeks and am having to get an even bigger pair of maternity jeans I know what a real bump is. Photos and layouts to follow eventually... My year 11's enquired the other day whether I would balance my cereal bowl on my bump like Phoebe from Friends! They just ask the most random questions. In fact they were getting so distracted in lessons suggesting baby names so I flippantly suggested that write them on a postcard and send them to me - so at the end of the lesson my desk was bombarded with little yellow post-its with an array of baby names from the cute - Ava - to the ridiculous - Mario! No offence if your kid is called Mario. It just makes me think of Nintendo!

I think the 'IT'S HERE' arrow post-it works perfectly with it.


I tried two new techniques:
  • the cluster of bling. This was created using lots of glossy accents and sequins to emphasise the mannequin. 
  • The border created by circle punches cut in half. I think its an easy, but effective technique.


The supplies I used are mainly American Crafts - I love the floral and peach together accented with the turquoise. In fact I think its a very 'spring' coloured layout - all I need now is the sunshine and blue skies to go with it!

In other news its Easter holidays - yay! We are off to Cornwall on Sunday night for a pre-baby mini break. I haven't been to Cornwall since a family holiday when I was about ten so any recommendations for places to eat, good tea rooms (love cake!) or places to eat would be very welcome. I think 'Once Upon a Time' will have outgrown me by now!

24 Mar 2013

Elephant canvas for the nursery...


 I mentioned in a few previous posts my intentions to make canvas' for our nursery - ready for our new arrival in July. We are only in rented accommodation so I don't want to commit to a project too big - like wallpapering or painting a feature wall. So canvas' seems like the happy medium.
There are many tutorials on blogs and youtube and I took inspiration from these but went my own way with it too. Below is a step-by-step tutorial - including lessons that I learned along the way.


Step 1 - Decide upon your colour scheme. Prep canvas with gesso allow to dry. Paint one coat of acrylic paint - I applied mine with a foam applicator, but a sponge would work as well. Allow to dry. Apply second coat.

Step 2 - Decide upon your design. We originally wanted elephants and giraffes, but the giraffe silhouettes looked a bit strange and didn't look as cute or convincing as the elephant - so we went for one big elephant and then two little ones. I just got the picture from google.

Step 3 - Cut the design out and then trace in pencil onto chosen fabric. Remember that it will be in mirror image. Cut the design carefully out of the fabric - my fiskars scissors come in hand here.

Step 4 - Attach the fabric with modge podge to the dried canvas. Modge podge all over the top (see third picture) don't worry it will dry clear. I added heart buttons for the eyes with modge podge too.

Step 5 - Allow the whole thing to dry. On the top canvas I decided to outline the elephants in black fabric paint to add more definition.

Tips:
  • Pick a dark coloured fabric as the yellow was a bit see through and up close you can see some of the glue underneath.
  •  Be very careful that you flatten the fabric down before the clue dries - as you can see the second elephant has a bit of a crease on it. Some bloggers recommended reinforcing it with modge podge first or backing with cardboard.
  • The yellow canvas also shows up some of the plush from the fabric and it dried into the modge podge. This, as I am sure that you can tell, was the first one and I might redo it as I think the little imperfections will annoy me.
  I made some canvas' of our wedding in the summer and the tutorial for these can be found here.

18 Mar 2013

Messy Mondays: Painting with American Crafts and Amy Tan

So as July 10th approaches and the little baby in my belly is wriggling away and making itself known I am becoming increasingly aware of the decline in our 'us' time. We often go on spontaneous dates - trips to the cinema, meals out, snacks like ice-cream or smoothie dates and I am sure that this will change as us becomes a three!
So I made the most of our recent 'donut date' and got a picture of the usually reluctant 'model.


I wanted this layout to be pretty with florals and hearts. I went for Dear Lizzie paper, mixed up turquoise paint to create a border and then created little clusters with washi tape, bling and strips of patterned paper.


Please tell me that this won't be the end of it all...that we will fade into the backround. Haha!


16 Mar 2013

What to do with paper too pretty to hide?


Are you like me? Do you have some pages you'd just like to stroke and admire and are always reluctant to actually use? I've been hoarding this gorgeous camera paper for ages and so was delighted when Shimelle's most recent sketch to scrapbook page was all about making the most of a really great patterned paper.
I used a picture from our honeymoon and used my travel stamps washi tape. I kinda messed up the page trying to do a line of embossed Amy Tan cameras, that turned out not to be very straight and so I tried to salvage it with a Martha Stewart star punch.
I'm not entirely sold on the pink and the green together, but I think it works.


The second layout I tried with this sketch is also a travel one. It is all about how the desserts in Thailand were often a dissapointment - until we got to MBK centre. It puts English food courts to shame and the desserts were all beautifully presented - as we do eat with our eyes after all.
I am a lot happier with the colour scheme on this one - I've never really paired brown and purple before, but I think it really works. A technique I've picked up watching lots of scrapping videos over at two peas is distressing, tearing and rolling the edges of the photo mat to make it really stand out. I have been watching a lot of scrapping tutorials as I have had a really bad cold and hacking cough - the poor baby!


What techniques have you been loving recently?
I've been getting messy with paints and have lots of brand new layouts to share with you soon!

2 Mar 2013

Precious Pictures...

Since storytelling Sunday is all about stories gather round, get comfy and listen...

My favourite classes to teach at school are often the smaller groups.
The nurture groups.
The ones who are not reaching for the stars academically.
And often don't have many (if any) positive role models in their lives.
Why do I like teaching these groups so much?
They have heart.
You get to know them a lot better as there are less of them.
You have to show them you care or you lose them.
So you use little quizzes (they love my Friday celebrity quizzes), sometimes treats and mostly anecdotes to win them round.
So last week we were studying a poem about a hurricane.
I asked what they would save from their houses in a natural disaster.
First answer,
"my computer games miss."
"Hmm nice try, but I honestly don't think most people would care about plasma screens and play stations - they can be replaced."
"My family then."
"My mum," chipped in the Burly Boy.
"I said it had to be a possession - an object." I reminded them.
"Money?" Cheeky One tentatively put forward.
"No," Trendy Boy interrupted knowingly. "Insurance will cover this."
"Photo's then, memories?" Suggests the only girl in the group.
"Bingo," I smiled.


So my 'precious' this month are the baby books I have made for The Belgian.
My mum did fill in a baby book for me and this is precious and I love to read the funny stories about my first birthday and first Christmas (where apparently all I was interested in was the selection box - no changes there then!) But there were lots of pics still to be scrapped and I had a mini album to fill.
I asked the in-laws for some pics of The Mini Belgian and I scrapped them in a little book - which is the only scrapbook I have ever made which he will proudly show to any visitors. When we entertain little kids too they love to look through it.
Also a scrapbook I made from my youth - more info and pictures of which can be found in this post.


These are all photo's that are irreplaceable.
In the days before digital.
These photos and albums are definitely very precious.

Related Posts Plugin for WordPress, Blogger...