Showing posts with label thrifty tips. Show all posts

4 Jul 2013

Freezer meals for the frugal...

So in order to get baby ready and also to prepare for the inevitable drop in our incomes (due to my maternity leave) I've been doing some research into ways to reduce the costs of our weekly shop.

Step 1: Change our way of shopping and possibly our supermarket
We'd got into the habit of popping into our local Sainsbury's every few days to stock up for a few meals and this is a costly way of shopping as you end up picking up lots of non-essentials. Plus Sainsbury's isn't the cheapest supermarket - but it is the biggest in our town and the little Asda often doesn't stock the fruit and veg I needed. We reasoned that we were collecting Nectar points and they do lots of vouchers and money off coupons.


So we decided to check out the local Aldi after work one night. Surprisingly it wasn't always cheaper.


The best deals we found were the packets of ten individually wrapped pain au chocolates for a pound - we often used to get these fresh in Sainsbury's two for 79p at the end of the night on 'sale.' The Belgian is fond of his pastries you see...perhaps the cheapest option would be to make them. One for the summer bucket list methinks.
 Also they seem to be winning the competition for cheapest nappies - only 7p each for the newborn size, whilst the Asda Little Angels are 9p each. Shame we had already stocked up at Asda!
There were things that were cheaper in Sainsbury's though, as these basics tortilla chips are around 45p there and Aldi was selling a similar pack for a pound.
However I think we cannot deny that in the competition to be the cheapest Asda is the winner and so to stock up for our big freezer meals shop we travelled a bit further to the biggest Asda superstore in Pudsey Leeds.
Step 2: So onto the part you've all been interested in...freezer meals. Bulk cooking and bulk buying with cheap ingredients and deals.

The Belgian spent a few hours on a Saturday and he made:
 8 spiced pepper pilafs
 5 mini (portions for two for a meal) golden veggie shepherd's pies
 12 meatballs with spaghetti sauce
 Six portions of spiced carrot and lentil soup

Then I spent an hour making a Macaroni and Beef cheese bake which I bulked up with some grated carrot leftover from the soup and it made three portions for the two of us.


Storage ideas:
  • Ziploc bags with cooking / reheating instructions written on with a sharpie
  • Ice-cream containers
  • Tupperware
  • We found some good disposable foil containers in the home section of Asda
  
Some other useful recipes and links:
Joyful Momma's top 5 freezer meals
Joyful Momma's Quesedilla Casserole
Joyful Momma's 10 more freezer meals for fall
Frugal Foodie's pinterest freezer meals board

Overall benefits of freezer meals:
  • An afternoon or morning of cooking and you have meals for a week or fortnight
  • These recipes all use cheap ingredients like beef, tinned tomatoes, carrots and onions and these can be found in bulk to get a good deal
  • You can make a recipe for tea that night but double it and freeze the remainder
  • Soup lasts about a month when frozen the other meals last about two to three weeks
  • When you want the meal you just put in in the fridge for a day to defrost or you can use the microwave
  • You don't have to think of ideas for dinner every night
We are definitely converts and I think that once you have a bigger family it makes sense - but even for a couple like us we're noticing less waste and cheaper food bills.
So...do you freeze meals? What ideas do you have for reducing food bills?

3 Jul 2013

Workspace Wednesday: Getting the paints out on travel layouts

I love to create a paint frame on a nice brightly patterned and coloured piece of card stock.
I don't often use enlarged pictures and find that you can create an easy layout with some washi tape, punched out stars and a nifty title.

Some Amy Tangerine cut out embellishments from a 12 by 12 sheet.
 For more of  my scrapping about Barcelona check out this layout of the cable cars here, for a layout with the view from on top of the cable car see here and one of my personal favourite layouts of the market here.

The top ten things to do in Barcelona (if you're lucky enough to be heading there this summer) check out here

For the second layout I used white paint to create a mat for the title and I misted the lettering using letter stickers as a negative mask.
Its all about our adventures on the night train in Thailand when we journeyed from Bangkok to Chang Mai.
A close-up of the title...

For more layouts of my Asian travels see here for a layout about Kota Kinabulu and Thai desserts, here for a layout about pad Thai on the Ko San Road and here for a layout about elephant trekking..

I am so jealous of Amy Tan having her babymoon adventures in Thailand at the moment...

8 Jun 2013

Saturday scrapping...

So before I head out to enjoy the sunshine I thought that I would share a couple of layouts I have been working on recently. They both feature pictures of my mother and I, doilies and 'homemade' embellies. As I have been scrapping with limited supplies recently (due to packing all my scrapping stuff away to make space for the nursery) I have been more creative with what I do have out - as I don't fancy routing through all my boxes to find a more suitable embellishment!
This first layout uses some scraps for matting the photo and ribbons stapled on to make the middle picture 'pop'. I used the doilies and border stickers for the main embellishment and a big title with oversized letter stickers - which have been in my stash for quite some time. The pictures were taken over mother's day weekend in March.


The second layout is from Christmas Day 2012. Unusually for me I barely took any pictures - but the main reason was that I was about 11 weeks pregnant at that stage and was sick not once, but three times, on Christmas day - a record for my pregnancy! But not one to be proud of!So my big camera stayed in its camera bag most of the time whilst I lolled around feeling sorry for myself. I know that I look really rough in this picture - but feel it captures my mood that day!
The funny story behind the picture is that I'd asked for Jamie's 15 Minute Meals book and then at a food fair in London saw a great deal of a year's subscription to Jamie's Magazine and his book and lots of extras for a really cheap price and so got it for my mom! So we'd brought each other the same present.
I used kraft, red and yellow non-Christmassy papers but I felt that the kraft and the red gave the page a festive feel. I love the little tag poking out and it has journalling about the presents on it.


Hope all you lovely ladies have a great day in the sunshine (if its sunny where you are!) I only have three weeks of work and only 33 days till D-Day. Ahhh! Exciting and scary!

30 May 2013

Thrifty Thursday: Using stamps as embellishments


So because I missed my Maternity Monday's bump update on the bank holiday as I was entertaining family - I thought that I would share my bump at 26 weeks layout. (Actually I have just realised that I missed my bump update for the whole month of May - its been crazy with exams and coursework deadlines at school!) My scrapbooking has been increasingly more thrifty and resourceful recently as everything is boxed up and so I am working with limited supplies - but it means that I am rediscovering old passions like stamping and embossing. The main embellishement on this layout is washi tape and then a stamped tag with the title and small little heart stamps to emphasise the pictures.


This second layout was created in probably 15 minutes. I used an old Studio Calico 6 by 6 pad and then on the ledger paper used washi tape and embossed alpha stamps to add the title. I also embossed the little Amy Tan his'n'hers icon - which I felt went along with this photo, which was taken on our 3rd anniversary getaway to the Lake District.
 A close-up of the stamping...

Over the last few days I completed a mini album of my baby pics and have been loving adding sequins as embellishment. I felt that with only six weeks to go till due date I needed to get that completed before starting on my own baby scrapping!

What techniques have you been rediscovering?
18 May 2013

Saturday scrapping: Layouts inspired by Jennifer Grace Creates

Didn't you all just love Jennifer Grace's Onwards and Upwards blog hop last weekend?

One of her challenges was to go up, and up, and up. There was a few options and I went with the one to use a photo inspired with the idea of flight - I immeadiately thought of some photos from a trip to London earlier this year to visit my sister. We went to a food show and as we left we noticed that we were at the launch pad for the Emirates cable cars across the Thames.
I used American Crafts and other travel ranges and layered 'up' as was one of the other prompts in this challenge.

I also used the Dear Lizzie Range to create the layout below of our Mother's Day celebrations. I keep meaning to post the recipe for the honey cake pictured below top - it was so yummy and I was so impressed that I could create an actual layer cake as opposed to cupcakes. This layout was also created with the 'up' prompt in mind and I used the chevron paper to use arrows on the page. 


Lastly the above layout of our mother's day meal. I used the 'to be inspired' prompt of using triangles to create direction on a page. I used Studio Calico wood veneers and Amy Tangerine stamps to decorate this layout and some other American Crafts papers to layer it up. I have a thickers and lettering shortage at the moment and so created the title using leftovers from several sheets.
These prompts all worked well with the way that I like to scrap and I am pleased with them.

10 Apr 2013

The satisfactory surprise!

So you may recall back in October I hit the big 30 and my husband whisked me off to London for the weekend to see Matilda and eat lots of yummy food.
Now when I was a teen my dad used to refer to me as High Maintenance Mel - I have no idea why. But I had a bit of a rep for having high expectations from boyfriends and just life in general. I think I'm pretty chilled, but there you go...
So a weekend in London would have been great if he hadn't tried to throw me off the scent by hinting at a weekend mini break on the continent somewhere. I think it was at the moment that I was putting all of my liquids into plastic bags that he realised perhaps his 'surprise' was going to backfire. Needless to say having grown up 20 mins from London and having a sister living there meant that London was no *quite* as exciting!
But it made for some good hidden journalling and here are two mini layouts from the trip.

 Click on them to see them in more detail.

Both of these layouts used lots of paper scraps that were leftover on my desk and so were quite thrifty - I was pretty happy with both of them though.
Have any of you experienced a surprise that backfired?

28 Mar 2013

Hello bump...layout!

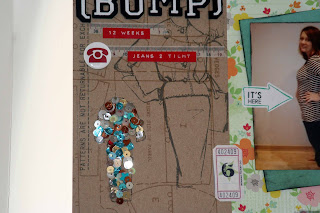
So I wanted to take pics of my growing bump during my pregnancy, but we haven't proved that good at it. The lack of sunshine has hindered post-work photo shoots and so I have just about got a pic a month. This was a hastily snapped pic at 12 weeks - taken on my phone.


You may have noticed that I am totally in love with my Amy Tan 'hello' stamp and it is featuring on a lot of my recent layouts. It just makes titles fun! In fact I think all of my 'baby' pages so far use it -perhaps it can be a 'thing'. Y'know like Shimelle uses kraft for all of her travel pages - I use 'hello' for all my baby pages.

It's funny that I thought that was bump. Now I am 25 weeks and am having to get an even bigger pair of maternity jeans I know what a real bump is. Photos and layouts to follow eventually... My year 11's enquired the other day whether I would balance my cereal bowl on my bump like Phoebe from Friends! They just ask the most random questions. In fact they were getting so distracted in lessons suggesting baby names so I flippantly suggested that write them on a postcard and send them to me - so at the end of the lesson my desk was bombarded with little yellow post-its with an array of baby names from the cute - Ava - to the ridiculous - Mario! No offence if your kid is called Mario. It just makes me think of Nintendo!

I think the 'IT'S HERE' arrow post-it works perfectly with it.


I tried two new techniques:
  • the cluster of bling. This was created using lots of glossy accents and sequins to emphasise the mannequin. 
  • The border created by circle punches cut in half. I think its an easy, but effective technique.


The supplies I used are mainly American Crafts - I love the floral and peach together accented with the turquoise. In fact I think its a very 'spring' coloured layout - all I need now is the sunshine and blue skies to go with it!

In other news its Easter holidays - yay! We are off to Cornwall on Sunday night for a pre-baby mini break. I haven't been to Cornwall since a family holiday when I was about ten so any recommendations for places to eat, good tea rooms (love cake!) or places to eat would be very welcome. I think 'Once Upon a Time' will have outgrown me by now!

24 Mar 2013

Elephant canvas for the nursery...


 I mentioned in a few previous posts my intentions to make canvas' for our nursery - ready for our new arrival in July. We are only in rented accommodation so I don't want to commit to a project too big - like wallpapering or painting a feature wall. So canvas' seems like the happy medium.
There are many tutorials on blogs and youtube and I took inspiration from these but went my own way with it too. Below is a step-by-step tutorial - including lessons that I learned along the way.


Step 1 - Decide upon your colour scheme. Prep canvas with gesso allow to dry. Paint one coat of acrylic paint - I applied mine with a foam applicator, but a sponge would work as well. Allow to dry. Apply second coat.

Step 2 - Decide upon your design. We originally wanted elephants and giraffes, but the giraffe silhouettes looked a bit strange and didn't look as cute or convincing as the elephant - so we went for one big elephant and then two little ones. I just got the picture from google.

Step 3 - Cut the design out and then trace in pencil onto chosen fabric. Remember that it will be in mirror image. Cut the design carefully out of the fabric - my fiskars scissors come in hand here.

Step 4 - Attach the fabric with modge podge to the dried canvas. Modge podge all over the top (see third picture) don't worry it will dry clear. I added heart buttons for the eyes with modge podge too.

Step 5 - Allow the whole thing to dry. On the top canvas I decided to outline the elephants in black fabric paint to add more definition.

Tips:
  • Pick a dark coloured fabric as the yellow was a bit see through and up close you can see some of the glue underneath.
  •  Be very careful that you flatten the fabric down before the clue dries - as you can see the second elephant has a bit of a crease on it. Some bloggers recommended reinforcing it with modge podge first or backing with cardboard.
  • The yellow canvas also shows up some of the plush from the fabric and it dried into the modge podge. This, as I am sure that you can tell, was the first one and I might redo it as I think the little imperfections will annoy me.
  I made some canvas' of our wedding in the summer and the tutorial for these can be found here.

21 Feb 2013

Diy chevron cushion cover

So earlier in the week I declared my intentions to actually do some crafty projects this week.
When I started to think about the fun of designing a nursery I started scanning pinterest.
I was in love with this cushion from Etsy  and this is partly what inspired the yellow and grey colour scheme
and the elephant theme.
But it was made in America and this equals large postage costs so I thought I'd have a go at creating a chevron pattern myself.


1) First I brought a yellow cushion cover for £3 at Ikea.
2) I created a chevron pattern with masking tape. Most blogs and tutorials advise you to use electrical tape as this eliminates the chance of the colour bleeding, but I found that masking tape worked fine. Also you a-types out there would definitley bust out a tape measure - but i just eye-balled it and the end result (pictured below) is accurate enough - so long as you don't look at it too closely!
3) Using grey fabric paint purchased at Hobby Craft and the sponge applicator (pictured at the bottom) I applied a generous layer of paint trying to go with the grain of the fibres on the pillow cover.
4) I had to wait patiently for the paint to dry. The Belgian found this very difficult and I had to swot his hands away many times.
5) Peel back when you are sure it is dry.
6) Stand back and check for any small errors - I then corrected these with a small paintbrush.
7) I then ironed it with a sheet of paper over it on a low heat. I should have ironed it first and would advise this to be your first tip.
I still need to buy a pillow to go in it and a rocking chair for it to rest on. I might do a smaller plain grey one and iron on a yellow polka dot elephant. I will do a photo shoot when its all ready, but for now you get the impression!


18 Feb 2013

Stamping on fabric...

Playing around with my amy tan stamps and a onesie. Do you like?


Related Posts Plugin for WordPress, Blogger...